MAKE Eindhoven
From March until May 2026 I was a resident at MAKE Eindhoven, a workshop for metal casting, glass, graphic techniques and digital fabrication, supported by Mondriaan Fonds. The timing worked out well because I was already planning to make objects for an upcoming video installation, So my goal was twofold. To create five objects that relate to the film, and to use the residency to start figuring out my own material expression. I’ve never really had the chance to work with materials in a focused way before, so this meant a lot of new processes and new ways of thinking and working, which was all quite exciting.
That second part was the more personal. My practice has lived inside computers for over a decade, in simulation, VR, and real-time engines. I was curious whether I could find an artistic expression through matter the way I had found it through code and virtual space. Every process I touched at Make, metal casting, glass slumping, sand casting, was new to me.


Decoding the Digital
There is a diagram by theoretical biologist Robert Rosen known as the modeling relation. A natural system is encoded into a formal system, the formal system runs its inferences, and the results are decoded back into the natural world. The loop closes when both sides remain in agreement.
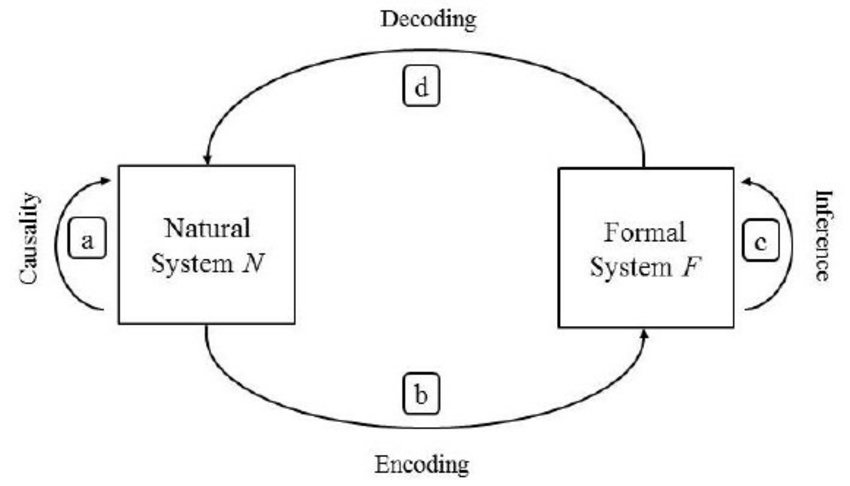
I kept thinking about this diagram during the residency, because my direction of travel was the reverse of the usual one. ESHRAQ is a formal system, a simulation with its own internal logic, built in Unreal Engine. At MAKE, I was decoding its objects back into the natural system: pulling forms out of the engine and letting physics, chemistry and labor have their say.
What I did not expect is how literal the loop would become. Some of these objects will eventually be scanned and fed back into the simulation as virtual objects. The bronze Gizmo, with its heat gradients and surface damage, will return to ESHRAQ carrying new meanings that only the physical process allowed for it to unfold. Encoding, decoding, and back again. This diagram in motion was simply my propeller throughout the workshop and perhaps in general with ESHRAQ as a whole.
The Pipeline: CAD/CAM as a Breeding Ground
All five objects passed through the same digital-to-physical pipeline, and most of my time at MAKE was spent in the CAD/CAM lab, which sits both literally and conceptually between the metal and glass workshops. (CAD is Computer Aided Design, CAM is Computer Aided Manufacturing.)
As an example the general workflow of making a cast metal piece went like this:
-
Model the object in Rhinoceros
Rhino is my favorite CAD software, and also the first 3D modeling program I ever learned, back when I was 18. Back then it was Rhino 4.

Screenshot - Rhino file of 'Soul View' showing different iterations of the design -
Design the mold from 3D model
Either as a negative or a positive depending on the process.

Small scale Test Mold - Negative Mold -
3D print the mold in sections and assemble it.
One constant challenge in the workshop was that print beds max out around 35cm, but my objects run up to 120cm. So every mold had to be designed modularly, split into sections with registration pins and tolerances, then glued, filled and sanded back into a single continuous surface. There is something fitting about this. ESHRAQ itself is built entirely from modules, and the constraint of the print bed quietly forced the same logic onto the molds.

3D Printed Positive Mold - Sanded and glued together -
Prepare the Mold for Casting
The most laborious part of this process. Involves making 3 sides mold using foundry sand. Cutting channels into the mold so the molten metal can flow into the model, and lastly coat the sand mold for smoother finish.

Lieve (Metal Technician at MAKE) preparing the Mold for casting -
Casting
Perhaps the most exciting part of this process! Pouring molten metal into the mold only takes 2 minutes but it’s a make or break moment for the piece after days of working on the mold!
Lieve and Rino casting Bronze into the Molds -
Demolding, Cleaning, Grinding and Polishing
This stage was pure joy. Cleaning up the cast, cutting the channels, and preparing the metal involves a lot of small decisions, and each one affects the final outcome. It becomes a creative process again, much like the initial designing of the piece. How you grind, how much, in what detail and which orientation, all of it genuinely shapes the result, and many of these decisions are made spontaneously as you go.

Aluminum cast metal after demolding Grinding and Polishing the Bronze
CAD/CAM was the part of the residency where I felt least like a beginner. My years of 3D design and printing translated directly. But the scale was new, and the engineering demands were real.Things such as draft angles so the cured sand releases cleanly, reinforcement structures so thin geometry survives demolding, tolerance calculations so the printed parts actually fit together.
The Objects
The objects I ended up making there are not props or merchandise. They are physical translations of elements from the film. Each one departs from a digital origin and submits to the conditions of the material world. Weight, surface, gravity, and imprecision all leave their mark. Below I explain a bit about the process of making all the 5 Objects I spent the last 3 months creating at MAKE:
1. The Divine Axis
The first object a viewer encounters in the installation is an XYZ coordinate gizmo, cast in bronze, about 60cm, suspended slightly tilted in the air.
If you have ever opened a 3D modeling program, you know this symbol even if you have never thought about it. The gizmo is the little three-arrow widget that marks the origin of the virtual world, the three axes, X, Y and Z, that tell you which way is left and right, forward and back, up and down. It is how we orient ourselves inside digital space. Every object I have ever made in Rhino or Unreal sits somewhere in relation to this little cross of arrows. It is the most basic tool imaginable, so basic that you stop seeing it. I wanted to take it out of the screen, give it weight, and place it at the entrance of the installation as a kind of threshold marker, a sign that you are stepping into a space that looks like the digital world but does not quite obey its rules.

The process was as follows. I modeled each axis in Rhino, printed them as positive patterns, then cast them in bronze using the sand casting process in the metal workshop. After casting, the three axes had to be welded together into the single three-armed form.
This is where the material started speaking back. When Rino, the metal advisor, welded the joints, the heat traveled through the bronze and left a gradient behind: dark, then purple, then orange, then shining metal. I had planned to polish the whole thing clean. I abandoned that plan the moment I saw it. If I ground it back, I could never reproduce this effect, it was a one-time event recorded in the metal by the welding itself. So I kept it.

Normally, in software, each axis has its own color: red for X, green for Y, blue for Z. I decided not to paint them. Keeping the whole thing in one shiny bronze takes that legibility away. You can no longer tell which arm is which axis, and that ambiguity gives the object a more mystical, ancient quality. It stops being a functional tool and becomes something stranger.

That is really how I think about this piece, as an archaeological symbol of our time. We are living in a moment when everything is finding its way into the digital, everything is being modeled, given coordinates, placed on these axes. I keep wondering what aliens, or humans a few thousand years from now (if we survive by then!), would make of this object if they excavated it from the earth. Would XYZ coordinates, our current way of understanding and representing space, still carry any meaning by then? Or would it look as cryptic to them as ancient instruments look to us, objects we dig up without knowing what they were for?

2. Rocket Shell
In the film’s opening sequence, rockets fall from the sky and release orbs of light to the ground. These orbs turn into Modules (digital objects) on impact. These rocket shells fly gracefuly to the sky so they actually never hit the ground.

But The physical version of it lies fallen on the ground, less graceful than its digital twin, affected by gravity in a way the simulation never allowed.

This object produced the most important material discovery of the residency. In the metal workshop there is an in-between substance: furan sand, the resin-bonded foundry sand used to make molds for casting. Once the metal is poured, the mold is broken and the sand usually gets thrown away. I became interested in this sand as an end material rather than a means.

Sand runs deep in ESHRAQ. The films begin in a desert, which I think of as the imaginal world: a place where things dissolve, but also where sand and light conspire to form endless images. Glass itself is silica. Working with foundry sand meant working with the raw substrate of the entire material language.

The problem is that cured furan sand is strong in compression but brittle everywhere else. A 77cm blade-like form would easily snap under its own handling. The solution came from the digital side: I engineered a 3D printed PETG spine, a tapered plate with perpendicular fins, holes through each fin so the sand locks mechanically through the structure. The spine sits inside the mold, invisible reinforcement, except where it is not. In some places the spine surfaces through the sand. Which made me think of The reinforcement as part of the aesthetic rather than a hidden fix.\


Not everything worked. I tried mixing white cement into the sand to shift its dark color toward a warm grey, and the chemistry fought back: cement is alkaline, the furan catalyst is acid, and the test crumbled with no strength at all. The color now comes from mortar mix (sand+cement mix) applied in thin washes to the surface. An interesting accident was that the mortar mix after it dries up, creates a chemical reaction with the foundry sand which makes a warm gray almost orange color that is exactly what I hoped to achieve.

3. Ababeel Bird
The Ababeel comes from the Quran, from the story of the Year of the Elephant. When Abraha’s army marched on Mecca with war elephants, God sent flocks of birds, the Ababeel, each carrying small stones of baked clay. The stones fell on the army and destroyed it entirely. A great example of mythological birds as divine weapons. The story is short, a single sura, but the image has held for centuries: death delivered from the sky by something small, fast, and untouchable.

Birds have always carried this double role in mythology, messengers and omens, protectors and executioners. What struck me is how precisely the Ababeel anticipates the drone. Modern warfare has made the airborne killer a constant parameter, an agent that hovers at the edge of every conflict. And drones, like the Ababeel, are wrapped in their own mythology: watch any military drone advertisement and you see objects deliberately designed to project fear, staged with the same reverence and dread that was once reserved for divine intervention. The propaganda aesthetic is the point here.
I wanted the physical bird to become a propaganda object. In ESHRAQ, the Ababeel carries the capacity to break the soul orbs, shattering them and evaporating the souls back into the sky. The red orb in its mouth refers to the stone of the Ababeel, the thing that kills you or frees you depending on which side you stand. Fear and attraction, destruction and release, condensed into a single sphere. But in the end, it brings destruction.

The physical bird is 3D printed in PETG at 115cm wingspan, printed in sections, assembled, and finished in matte orange with a glossy red resin orb. In the installation it hangs from the ceiling above a platform with an internal spotlight. The light casts the bird’s shadow large across the ceiling, making it appear far bigger than it is. This amplification is the propaganda logic in a scenographical language. War weapons are designed to project fear at a scale beyond their actual capacity.

Of the five objects this one stayed closest to its digital origin, and that is part of its meaning. It is the most directly menacing form in the installation, and it remains slightly too smooth, slightly too perfect. But it does swing here and then depending on the air flow in the space! and I do like the fact that it reacts to wind while being floated in the sky even as a static object.
4. Soul View
The most demanding object, and the one I will be honest about: it is still a work in progress. The residency brought it far, but it needs more time before it does what it is meant to do.
In the film, the Soul View is a recurring visual overlay, the world seen from within the soul, through a prismatic filter of reflection and refraction. The physical version is a speculative handheld device, close to a Nintendo Switch in form but with no screen. In its place sits a slumped glass lens within a cast aluminum frame, edged with prismatic glass tiles and a red internal light. Viewers will pick it up, suspended from the ceiling by its own power cable, and look through it at the installation around them.


The design, as explained in my earlier post, draws from the intricate tiled mirror work found in Islamic sacred architecture across Iran, the fractured ceilings of mosques and shrines, except here it is made with glass rather than mirror.
Glass turned out to be the most unforgiving material at MAKE. Metal forgives. Sand forgives. Glass does not. A single mistake in mold preparation ruins the entire piece, invisibly, until you open the kiln. The process taught me through a series of mistakes which at times has been hearbreaking, but I have learnt a lot now to avoid some of those mistakes.
The first mistake was in the sequence. I made the aluminum frame before making the glass. The truth is that the exact thickness of a kiln-cast glass piece is very hard to predict. You load the mold with many broken pieces of glass and they melt into one, and the form only resolves inside the kiln. The lesson is simple and now obvious: always make the frame after the glass comes out, never before. Now the frame needs to be remade.
The second mistake was in the mold itself. I had not given my resin printed mold enough draft angle in its inner edge, so the plaster refused to demold. The first plaster mold had to be broken to free the mold.


The third challenge took three or four rounds of testing: getting the prismatic details to read sharply while keeping the glass transparent. If the source mold, in my case 3D printed resin, is not extremely smooth, the plaster bonds with the glass surface and leaves it hazy. For the final attempt I sanded the mold for days, working up to 5000 grit, almost mirror-shiny, to get true transparency out of the kiln.

The prismatic tiles had their own subtlety. Molten glass resists sharp edges, it wants to round itself, so crisp geometry is tricky to achieve. The solution was to cut tiny channels, about a millimeter, along the edges of the mold, guiding the melting glass into them to produce a sharper line.
This piece was the most ambitious one to make, but I’m curious where it goes at the end given all these design and engineering challenges it demands!

5. Past, Present, Future
Three variations of a single room, each 45cm wide, wall-mounted in a row. The first follows the spatial logic of traditional Islamic domestic architecture. The second strips it to a bare contemporary cube. The third inverts the floor so habitation becomes structurally impossible. Same module, slightly recomposed, creating three different realities.

The blocks are 3D printed in PETG and coated with a slurry of silica sand and binder, giving them a mineral skin. The most interesting design decision was the smallest one: the seams. Each room is assembled from printed blocks, and instead of hiding the joints I preserved them, scribing each seam back into the wet coating so the assembly logic stays readable, like mortar lines in masonry. The modules declare themselves.

Another great surprise with this piece, was in the final presentation. When I organized all objects on different tables, including this one. I couldn’t make the 3rd one stand by itself (because of gravity) and didn’t want to hang it on a wall yet. So instead I leaned it on the Cubic one in the middle, and instantly I was like, “Wow It should have always been like this!” So now I’m thinking of presenting it like this instead of straight hanged on the wall:

Errors as Material Language
When I design digitally, the result is almost flawless by default, and that flawlessness is a problem. Work that is too perfect becomes generic. It gives the viewer nothing to hold onto. At a certain level of digital skill, your abilities start working against you, and you have to unlearn.
The workshop forces this unlearning. There is no CTRL-Z. A mistake in metal or glass sets you back days, and so every error is expensive enough to demand a decision: fight it or keep it. The weld gradient on the Gizmo. The spine surfacing through the sand. The subtle cracks on the soul view glass. Each one is information about the encounter between a formal system and a natural one, and erasing them would mean pretending the crossing was frictionless.
It was not frictionless. That is the point. And I’m learning to let the objects carry the evidence.
Closing: Toward the Installation
Film, sound, scenography and interactive simulation along with these physical objects will eventually come together as one environment. Thanks to the advisors and interns at MAKE Eindhoven for their generosity and expertise across metal, glass, graphics and the CAD/CAM lab, and to Mondriaan Fonds for supporting this residency.
If you are interested to keep in touch with future updates, please feel free to subscribe to the newsletter below: